How to Optimize Images on Squarespace

Speedy load times are crucial – and they can give your website an SEO boost! One of the easiest ways to make your website load faster is to properly format your images. In this post I’m going to walk you through the entire process of how to prepare and format your images to upload to your website.
In this Article:Overview
Step 1: Resize the image
Step 2: Compress the file
The results
Video tutorial
Ever land on a website that took forever to load? How long were you willing to sit there and wait? Chances are if it took more than a couple of seconds, you lost interest and moved on. Even those of us with yogi superpowers of patience and calm can occasionally suffer the perils of a short attention span. (We *are* human, after all.)
In the age of the never-ending scroll, speedy load times are becoming more and more crucial. There’s a lot of reasons why your website might be loading slow. Some of the most common include limitations from an internet service provider or using a janky old browser that struggles to render fancy new websites. But you can’t control either of those for your website visitors.
Lucky for you, what you can control is something that’s on almost every website – and something that also happens to be an easy fix. It’s your images.
Preparing your images for your website only takes a few minutes, and the payoffs can be huge. In this blog post I’m sharing the step-by-step process I use before uploading images to every Squarespace website I make (mine included!)
First, an overview
Before I dive in to the details, let me give you an overview. When you get images from your photographer, download from a stock photo site, or grab them off your camera, they are usually LARGE images. When I say large I mean a few megabytes – maybe something like 3MB, maybe more. These high-quality images are big enough for printing a large poster or even a billboard.
But website images don’t need to be super high-quality. They need to be clean and crisp, but small enough they don’t weigh down your site and make it load slow.
To make images smaller, we use a two-part process: first, we resize them so instead of being large enough for a billboard, we shrink them for screens. And then, we compress them juuuust enough to make a major gain in file size. That’s it!
In this tutorial, we’re going to use the image below, which is originally a whopping 9.4 MB. That’s huge, and waaaaaay bigger than we ever want to add on a website. After a few quick steps, we’ll get this beautiful shot down to a measly 85 KB, ready to upload to a website. That’s just 1% of the original file size!!
Step 1Resize the image
High-resolution images are usually something like 6000 pixels wide, and that’s roughly the original size of our example image. But for a website, you need something much smaller. I recommend going with 1500 pixels for most images on your site.
This figure isn’t the end-all-be-all dimension, and there are times you’ll want your image bigger or smaller. If you’re using a photo as a background, for example, you’ll probably want something more like 2000 or even 3000 since it’ll take up much more real estate on a screen. If you know the image will just take up a little space on the page, you can probably go with about 800 pixels.
When in doubt, go with 1500 pixels.
How it’s done:
These steps are specific to a Mac, but if you’re on a PC you can still follow along. The specifics just might be a little different. And if your photographer gave you web-ready images or the dimensions are already less than 1500 px, you can probably skip this step and move on to Step 2.
First, make a copy so you don’t overwrite the original. I often add the size to the filename of my images, so if the original is called books.jpg, the new version will be books-1500px.jpg.
Open the image in your default image viewer. (On a Mac, it’s the Preview app.) Unless you’ve changed your default settings, you can just double-click the image and it’ll open this way.
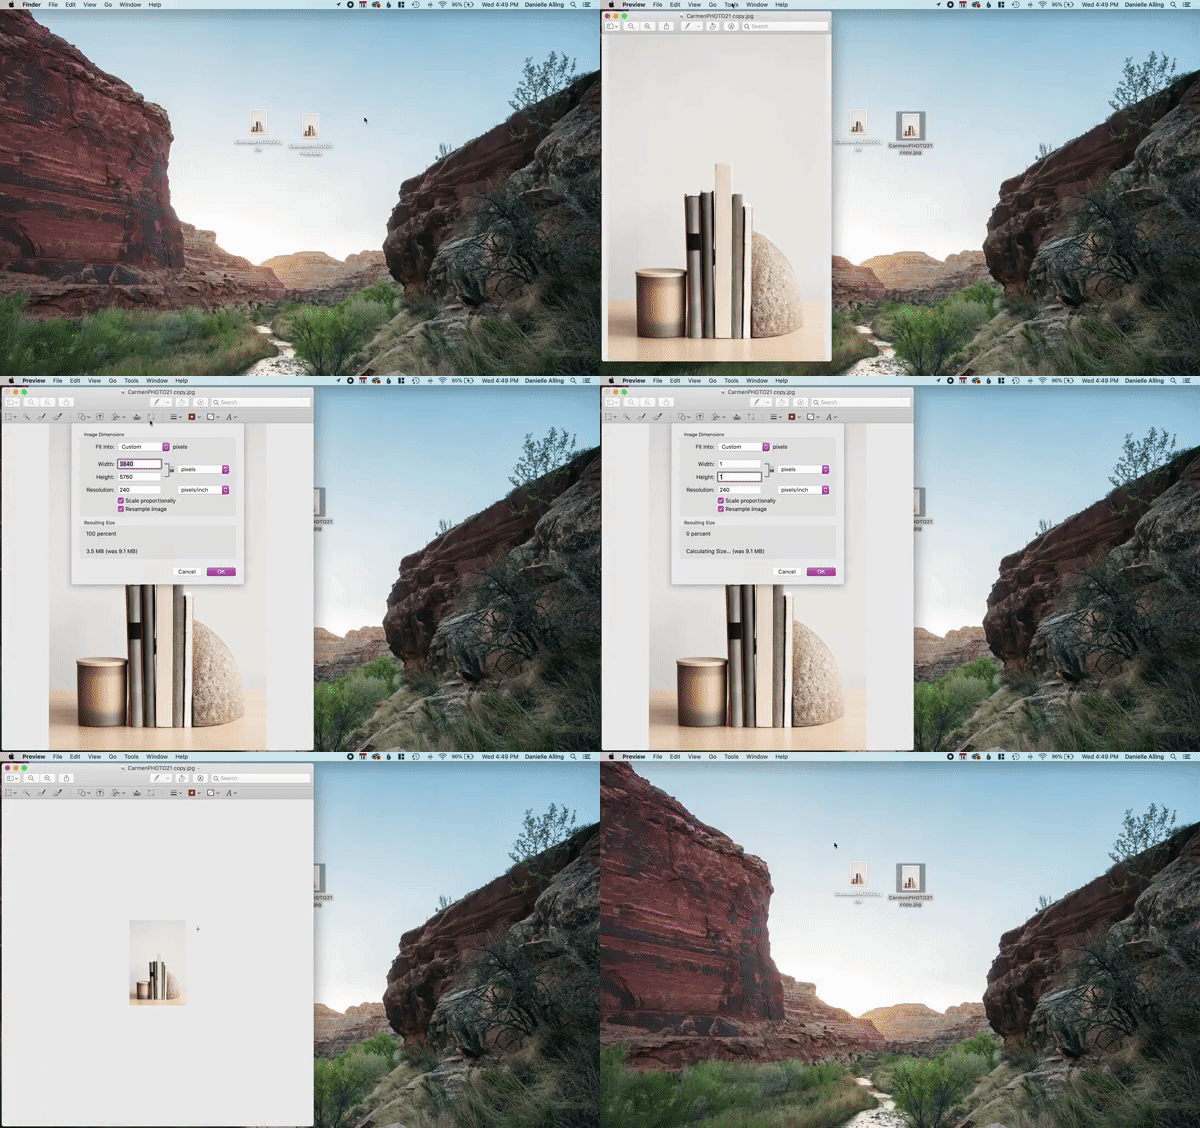
Go to Tools > Adjust Size. Change the longest dimension to 1500 px.
Once you’ve made the change, save and close the image. You’re ready for Part Two!
The gif below shows how to resize the original image to 1500 pixels on a Mac.
Step 2Compress the file
After Part One the file size will be quite a bit smaller. In this example we got the image down to 651 KB. That’s already huge!!
But ideally we want the file size below 500 KB, so we’ve still got a little work to do. We’re going to use a service called TinyPNG to compress the file even further. This works by selectively decreasing the number of colors in an image, without compromising the quality or crispness of the image.
How it’s done
TinyPNG makes it really easy to do this. Here’s how:
Go to www.tinypng.com.
Drop your file into the little box.
Download the compressed version when it’s ready!
The results
In the image below, you can see the side-by-side comparison of how these two steps reduced the size of our original image by a whopping 99%. On the left, the original file size is 9.4 MB. On the right, the final web-ready image is just 86 KB!
And that’s all there is to it! Resize to 1500 px, and compress with TinyPNG. Just two easy-peasy steps to make your site load faster and keep your visitors stickin’ around longer. It’s a win-win… and those of us lacking in Super-Yogi Patience will thank you!


